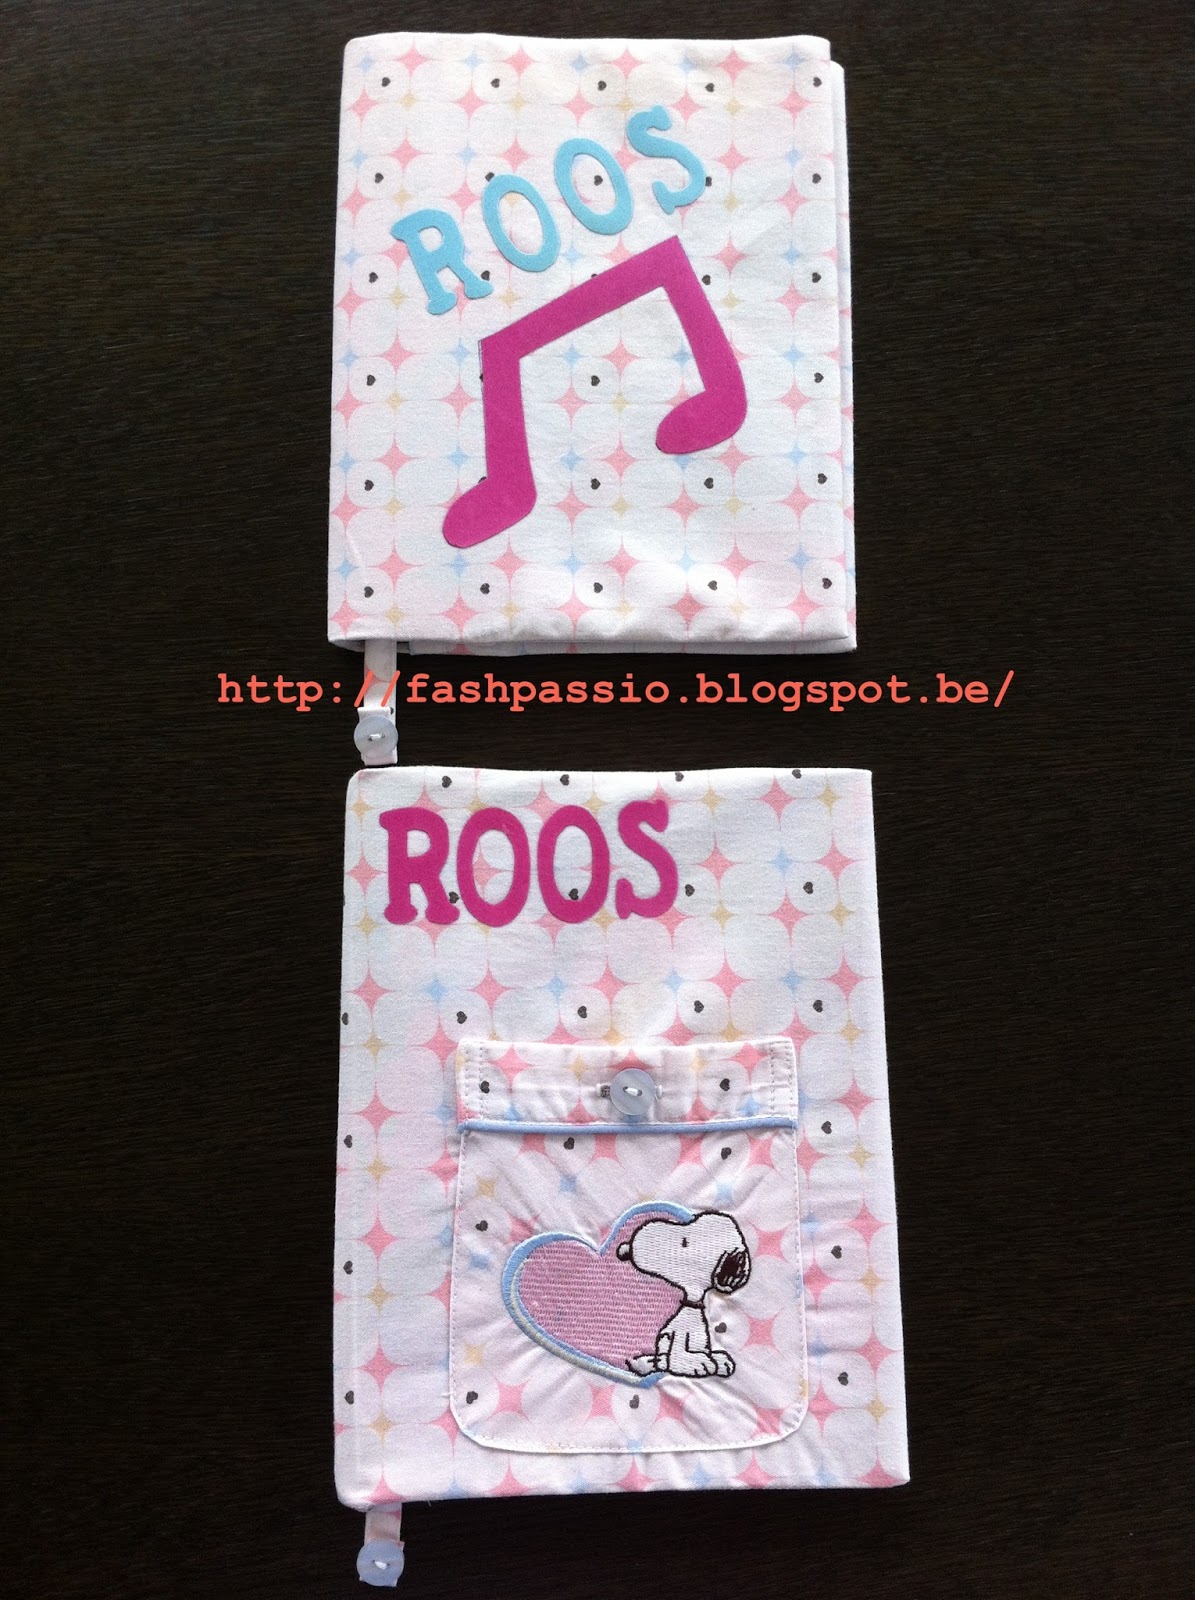
BACK TO SCHOOL IN STYLE WITH NEW COVERS FOR THE NOTEBOOKS!!!!!
The first assignment of every school year is always the same... "Please, cover your preschoolers notebook and music book".
So this year I started a little bit earlier to make a nice and special cover.

First I took the measurements and cut it out the covers of some old kids magazines. This I will put in the selfmade covers, to give it some strength.
Then I had a look in my wardrobe and found some old clothes.
I will use the pants of my pregnancy pajamas for Roos her covers and another old pregnancy pants and an old baby shirt for Stan his cover. So it will be a little recycling project... Here we go!!!!

First I cut my sons name out of the old baby shirt.

On the backside of the letters I iron some vlieseline to make it stronger and to prevent unraveling.

For my daughters name I'll use flock foil

The rectangular I cut out of the fabric (pants) has the following measurements:
- twice the length of the notebook, and
- the width of the notebook added by 3 cm.
I iron also vlieseline on this for the same reason as mentioned above.

First I hem the short sides

Then I sew the name, pocket, embroidery or iron the flock foil,...

For the next step I flip both sides around the notebook to the middle (wrong side out and the good side in). Pin the top and bottom (long sides) around the notebook (approximately at 1 cm of the border on top and at the bottom). Then take the notebook out and sew the long sides top and bottom.
This is the result:
The front

The inside


The back


A variation of "A HAIR CLIP ORGANIZER" (see below)

1) What do you need?

a thicker fabric as basis (49 cm x 32 cm)

A strip of another cotton fabric (137 cm x 8cm)

2 shorter strips in the same cotton fabric (34 cm x 8 cm)

6 squares ( 10cm x 10cm)
6 strips (25cmx10cm)

4 biais strips to sew around the basis
2) How to start?

- first make the strips (see page SEWING "A HAIR CLIP ORGANIZER")

- put the long strip on 2cm of the left side and the other end of the strip on 2 cm of the right side
- put the short strip 11 cm further and the second short strip another 11cm further
- Pin the strips and then sew the biais on the bottom of the basis

- pin the short strips also on top of the basis and perform the first step of sewing the biais
- then pin the long strip on both sides on top of the basis
- now perform the second step of sewing the biais

- then sew the biais on the right and the left side of the basis
3) the little bags:
I made different bags then in the other example.
6 squares ( 10cm x 10cm)
6 strips (25cmx10cm)
- iron the seams of 1 cm of the squares and sew the top seam
- iron the seams of 1 cm of the long strip, then fold the long strips in half
- put the square on top of the long strip an sew along the edges

- make in each bag a buttonhole

- then sew all the bags with an embroidery stitch on the basis


- then sew the buttons on the little bags

- organize the hair clips and hair rubbers per color

- fold the left side to the right for 1/3, sew press-studs on the right side on top and bottom (sew second part of the press-studs on the other side now)

- fold the right side to the left side and close the press-studs
- sew the other 2 press-studs in all the corners

- fold it together and close the press-studs
A BAG AS GIFT FOR THE TEACHER
- Take 2 fabrics. At least one fabric has to be thicker (may be 2 as well).
- cut out both fabrics a rectangular of 74cm/37 cm

- then write on another fabric (can be done on a leftover) all the names of the kids of the class, or a saying,...
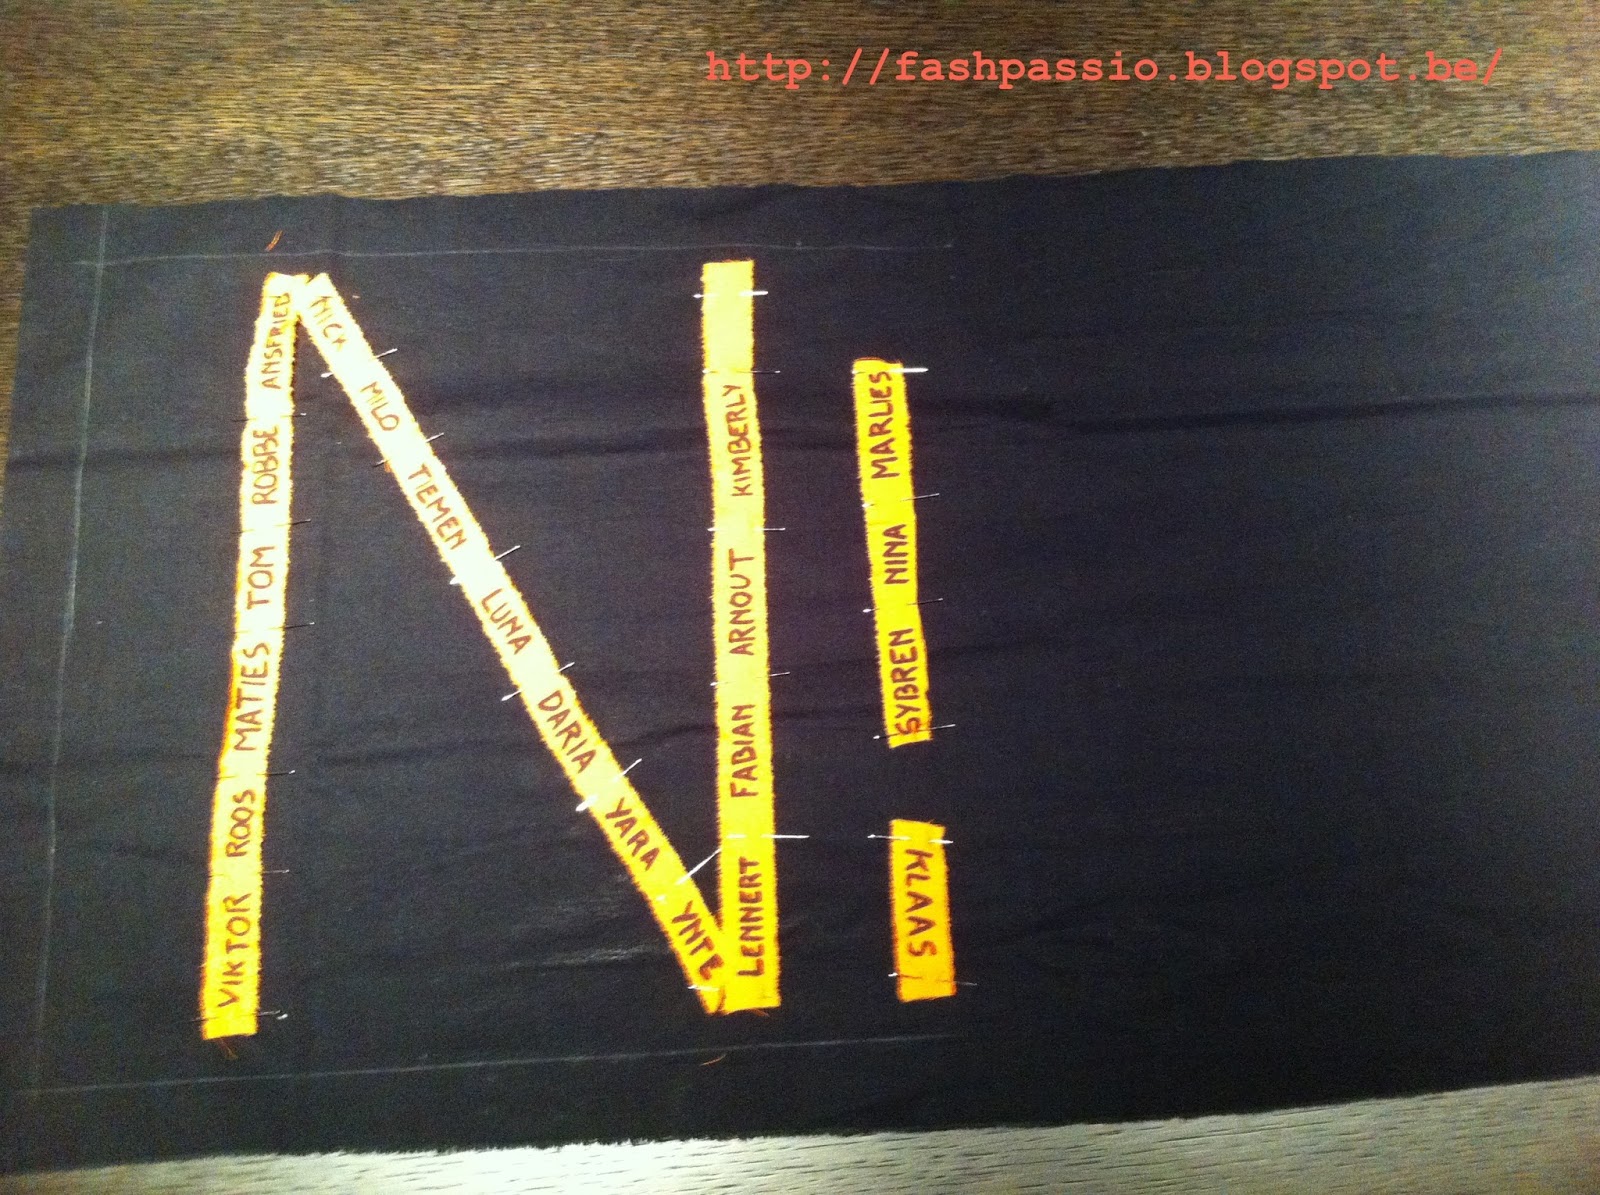
- pin it on the inside fabric on the good side and in the middle of 1 half of the fabric

- sew it on. Here we used all the names of the kids and sewed it in the shape of the capital N (the first letter of the teacher's name)
- hem the top of the rectangular ( 2 cm). Do this also with the other fabric.

- fold the fabric in half (good side on the inside) and sew the side and bottom. Do this also with the other fabric.

- then cut 2 times 9cm/110cm (or the desired length to wear the bag plus 3 cm on each side to put in the bag while sewing)
- fold them lengthwise, good sides facing each other, and sew on 1,5 cm
- then turn both handles inside out

- put both the fabrics inside out as well, so that both the good sides are at the outside.
- put the inside fabric in the outside and pin them
- take the ears of the bag and put them 3 cm on each side in between the two fabrics. And pin them.
- try it on to see if the length is good and straight. If not you can still adjust.

- then sew , inside-outside and ears on 2mm of the top
- and sew a second time on the stitching of the seam

- you can use this bag recto verso

- just turn it inside out


MY FIRST DRESS WITH A LITTLE HELP OF...
"STOF voor durf-het-zelvers" from Lies Botterman and Griet De Smedt

I made the dress of page 76 - pattern 8 A,B,E
My daughter's size is 110, but for this dress I used size 122-128 and it fits perfect!!!!

I sewed biais around the armholes and collar.

When I find some more time, there will follow a nice handbag to go with it ;-)
MY FIRST SKIRT IS A FACT!!!!
Thank you MME ZSAZSA...

I used the book " allemaal rokjes"

it is the "all in one" skirt!!!!!

AND NOW YOU CAN ENJOY THE SHOW...


FLOWER BAG
using a pattern of "fynnch.blogspot.be"
I followed the tutorial step by step and it worked out perfectly!!! The tutorial is really clear and accompanied with nice pictures!!!!
I used some different measurements because my fabric was a little bit too small ;-)

And to make it a little bit more personal, I ironed a flower and Roos her name in flockfoil on the bag. I did that before I started sewing.
I made some picture while making the bag!!! Here they are.


MATCHING HEADBAND
If you're making a skirt or a dress and you have some extra fabric left, well then you can make a matching hair ribbon.

* make the pattern
first part:
- measure the head (5 years is around 52cm)
- fold pattern paper double
- draw a basis-line of 20 cm
- at the folding line: draw a line (12cm long) parallel to the basis-line 3,5 cm above and under
- at the end of basis-line (at 20 cm), draw a point 2,5 cm above and under the basis-line
- draw a line from the end of 12cm (3,5cm above) to the point of 2,5 cm above basis-line
- draw a line from the end of 12cm (3,5cm under) to the point of 2,5cm under basis-line
- cut out this pattern
- cut it twice out of the fabric
- and cut it also once out of vlieseline (a little but smaller)


second part:
- draw from the folding line a basis line of 13 cm
- at the folding line, draw a line (6,5cm long) parallel to the basis-line 2 cm above and under
- at the end of the 13 cm basis line draw a point 2,5cm above and under
- draw a line from the 6,5cm point to the point 2,5cm above the basis line (under and above)
- cut out this pattern
- and cut it twice out of the fabric
last part:
- cut an elastic of 16 cm (if head is 52 cm)
- otherwise you have to calculate : 40 cm headband + 12 cm elastic = 52 cm
but on top of this 12cm you add another 4cm for the seams => 12 cm + 4 cm = 16 cm

1. iron the vlieseline on the top part of the headband (the flower part here)

2. put the good side of the fabrics on top of each other and sew the long edges on 1 cm
3. cut the excess fabric away
4. do this for the headband and for the casing for the elastic


5. then turn the casing inside out
6. get the elastic through the casing with a safety pin and fix it at the top


7.put this through the casing of the headband (still the good side of the fabric on the inside)

8. stitch across (forward, backward of forward) this all on 1 cm of the edge

9. pull the elastic casing out and this way turn the headband inside out

10. then fix the elastic and the casing in the other side of the headband. Try it on to see if it fits. Then sew across all (forward, backward, forward)


Finished !!!!!


you can wear it on both sides!!!!!! Easy.

Have a look at "my first skirt is a fact thanks to mme zsazsa"...

A HAIR CLIP ORGANIZER

* The basis
- use a strong and thick fabric for the basis, size 48 cm x 35 cm (grey in this picture)
- sew a biais along the edges of the basis
* The ribbons

- use a bright colored fabric to cut 2 rectangles, size 75cm x 7 cm (seams included)
- iron the seams (1cm at each side) from each rectangle to the inside

- fold one end on the other and iron
- sew 1mm along all the edges
- do the same with the other one
- lay one ribbon at the left side of the basis (next to the biais) and one on the right side. Sew across the bottom of the ribbon (forward, backward, forward) and sew once more across the ribbon on top of the basis (forward, backward, forward).
- attach the ends of both the ribbons ( I attached them with two push buttons)

* The little bags
- Now we make 6 little bags for the hair-rubbers
- Cut 6 times 18 cm x 11 cm, and 6 times 18 cm x 8 cm

- put the smallest rectangle on top of the bigger one
- iron the seams (1cm) to the inside
- first we make the casing: fold the top, the single fabric, on the double fabric, iron it and sew it
- then put the other ends together and sew on 1mm along the edges (but leave the openings of the casing open)
- put a cord through the casing

- attach the little bags onto the basis with push buttons

* What to do with the diadems
- make another ribbon, cut a rectangle of size 35 cm x 7 cm
- follow the same steps as above to make the ribbon
- then put the ribbon in the middle of the basis and sew across the top of the ribbon (forward, backward, forward)
- leave some space (around 1 à 2 cm) and sew again across the ribbon and continue this process till the end of the ribbon.
- through these openings you can put the diadems
The inside is finished now!!!!!

- little bags for the hair rubbers and hair ribbons

-2 ribbons to organize the hairpins
- and finally we created a few openings in the middle to organize the diadems, bracelets,...
* Now we make out of all this a nice and little handbag!!!!

- fold the left side to the inside, and be aware to leave enough space for the diadem
- attach both the corners ( top and bottom) with a push button

- then fold the right side on top and attach both the corners as well with a push button

- and to finish the bag, fold the bottom upwards to the top and attach once more both the corners with a push button.
DRAUGHT STOPPER
It's getting cold again!!! A draught stopper would be the perfect solution to stop winter entering our home;-)


Pin the pattern on the jumper/dress and be sure that you cut the two layers.


You 'll need an extra couple of sleeves to fill the whole draught stopper. I stuffed 4 sleeves.

Sew the ends of the sleeves

Cut 2 circles with the same perimeter as the width of your pattern (34 cm in this case). Sew all the ends including the circles, and make sure you stopple all the edges, so they won't unravel.

In the middle of the draught stopper I put some press buttons.


BIRTHDAY GIFT FOR TEACHER AND KIDS
What to give the teacher and the kids from school when your daughters 4th birthday is coming up?
We made delicious muffins. But I wanted to give something personal to take along. So I looked in my recycle boxes... and I found:
Two old jerseys a bleu and a brown one, an old jeans and an old shirt.

Make a mold, and copy it on the inside of the jersey's. Cut it, sew it. And leave a little hole, where you can turn it inside out. Then stuff it, and stitch the little whole. Cross stitch the eyes, nose and mouth.

You can personalize it the way you want. I put the first letter of every kid's name on the belly, and put a name card on the side.

I used an old bleu jersey to make nice personalized bears for the girls,and an old brown jersey for the boys.

For the teacher I made a nice bag from an old jeans!!! And to take it to school I put all the bears in the bag.


To personalize the bag I put the teacher her name on one side of the bag with a few flowers.

and on the other side I put all the names of her pupils.

Geen opmerkingen:
Een reactie posten