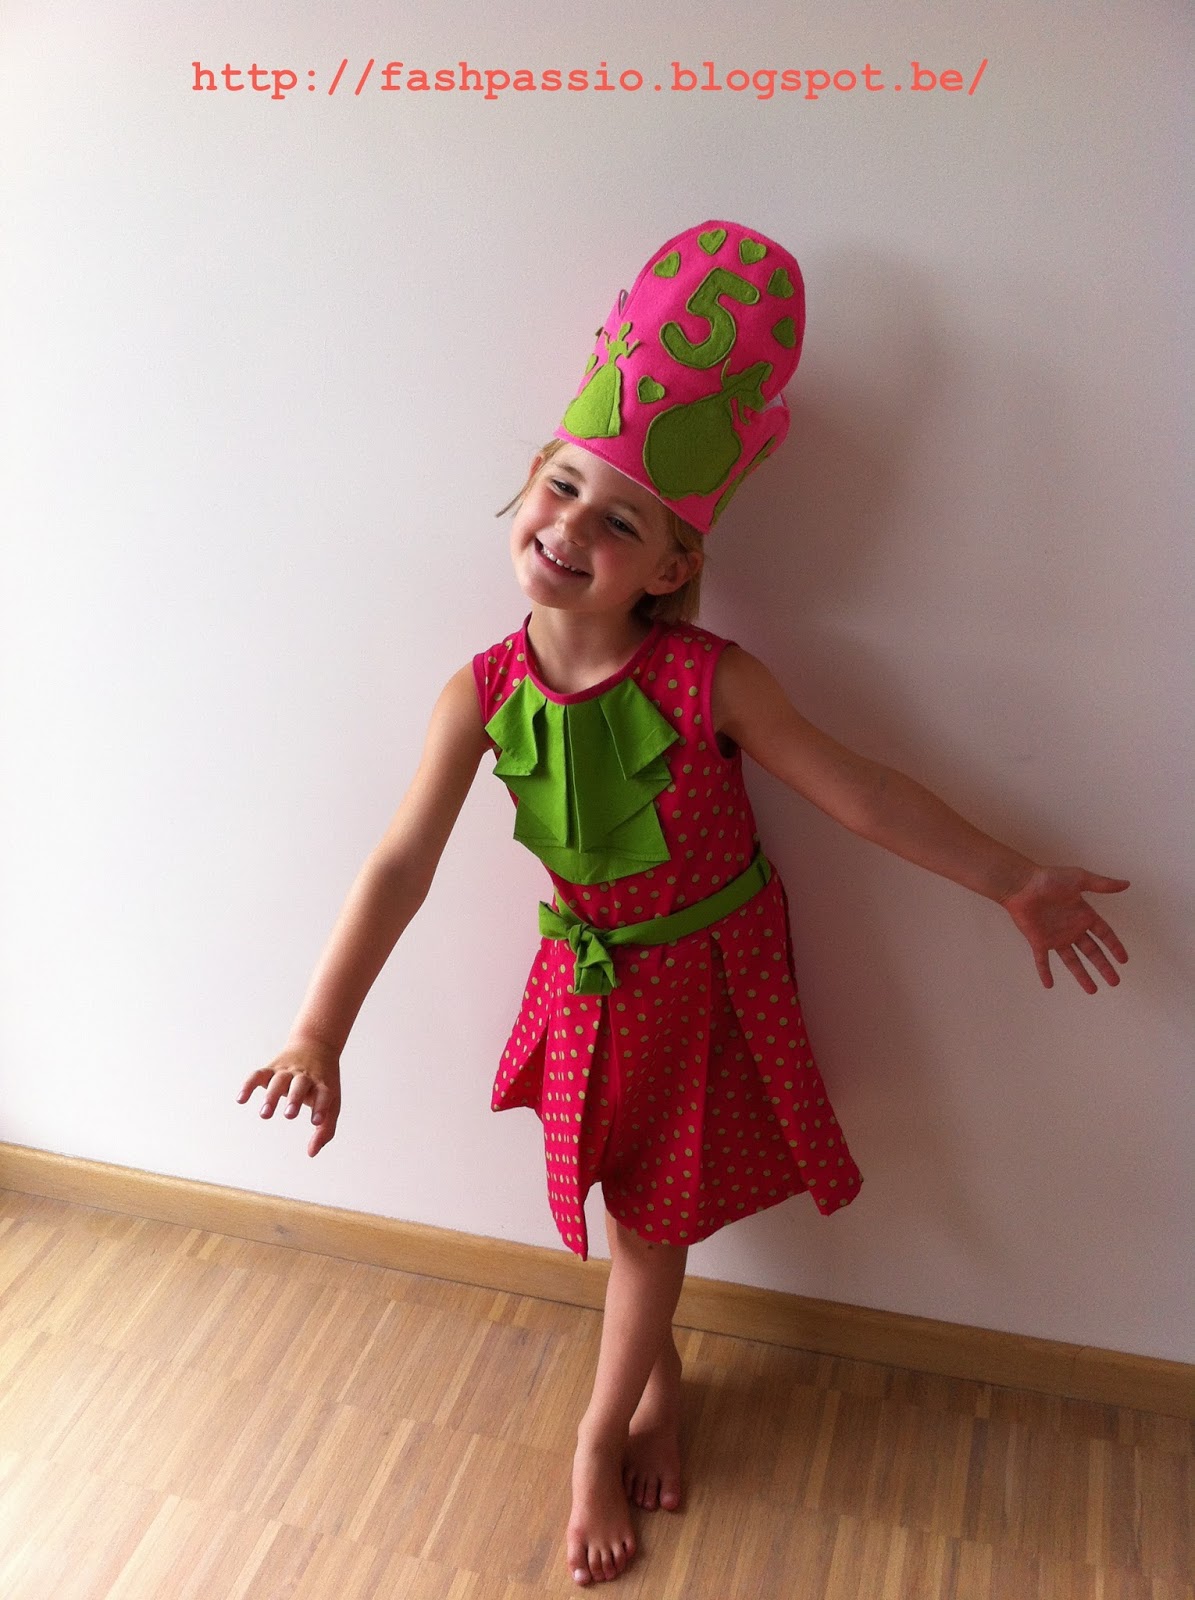
The summer holiday is coming closer and closer. This means birthday-time for Roos - already 5 years old!!!! Finally old enough to help with the preparations for her party. She loved it!!!
We made INVITATIONS, GIFTS FOR HER CLASSMATES, GIFT FOR THE TEACHER, BIRTHDAY CROWN, DECORATION FOR THE HOUSE
We made INVITATIONS, GIFTS FOR HER CLASSMATES, GIFT FOR THE TEACHER, BIRTHDAY CROWN, DECORATION FOR THE HOUSE
We worked around the THEMES; FISH (for the boys) & FLOWER (for the girls).
1) THE INVITATIONS:


- first take colored thick paper - blue for the fish and pink for the flower.
- fold it in half
- cut the fish and flowers


- then take colored, thin origami paper - orange for the fish, pink and yellow for the flower.
- cut the scales out the orange papers
- use the perforator on the pink and yellow papers


- glue the scales on the fish and write the name of the guest on the tail
- draw an eye and cut out the mouth

- write the name of the guest on the flower
- glue the dots on the flower around the name of the guest

2) THE GIFTS FOR THE CLASSMATES
- crocheted fishes on a key ring for the boys
- crocheted bracelets and necklaces for the girls

- for the necklace, you crochet a chain of 52 cm ( for a 5-year old)

- then return with a loop of 10 stitches
 - crochet waves:


 - And then in reverse order back, but without the normal chain stitch
- Continue this till the end of the chain.
- At the end sew on a button that fits in the loop of the other end
-----> necklace finished!
PRESENTATION OF THE GIFTS:
- Take paper cones, and decorate.
- make a little whole for the key ring or the bracelet and the necklace


- Put a muffin in every cone
- Then paint a big cardboard box blue with green seaweed and decorate with foam fishes. Arrange the gifts in the box and you'll have a perfect presentation!!!!


And of course for the teacher we made something special!!!!
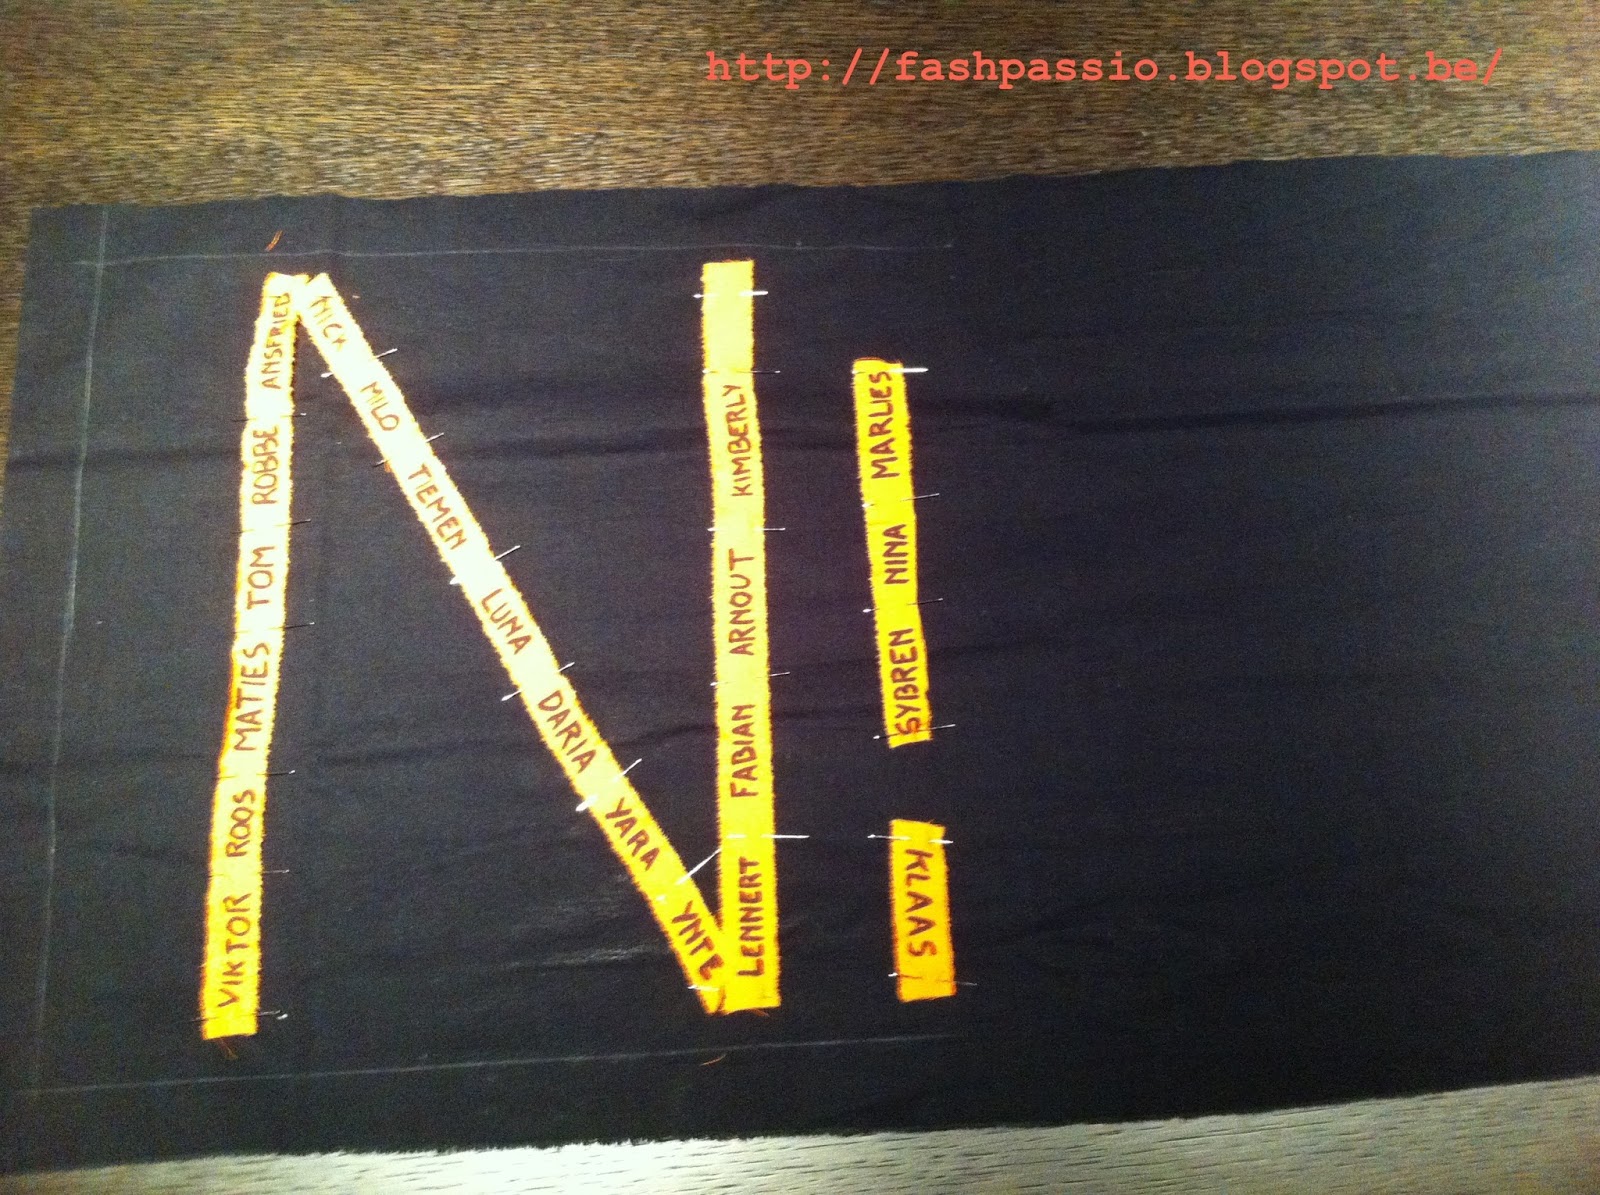
3) GIFT FOR THE TEACHER
- Take 2 fabrics. At least one fabric has to be a thick fabric (but the second fabric may be thick as well).
- cut a rectangular of 74cm/37 cm from both the fabrics

- then write on another fabric (can be done on a leftover) all the names of the kids of the class,...

- pin it on the good side of the fabric which you want to put on the inside of the bag

- sew it on. On this picture all the names of the kids are sewed in the shape of the capital N (the first letter of the teacher's name)
- hem the top of the rectangular (2 cm), on both the fabrics

- fold the fabric in half (good side on the inside) and sew the side and bottom. Do this also with the other fabric.

- then cut 2 times 9cm/110cm (or the desired length to wear the bag plus 3 cm on each side to put in the bag while sewing)
- fold them lengthwise, good sides facing one another, and sew along the edges on 1,5 cm
- then turn everything inside out; the bags and the handles

- put the inside bag in the outside bag (the good sides facing to the outside) and pin them
- take the ears of the bag and put them 3 cm on each side in between the two fabrics. And pin them.
- first try it on to see if the length is good and if the bag hangs straight. If not, adjust it.

- then sew , inside-outside and ears on 2mm of the top
- and sew a second time on the stitching of the seam

- you can use this bag recto verso

- just turn it inside out


5) FLOWERS AS DECORATION
- blow 4 pink balloons and 1 yellow balloon.
- tie them with a rope as a flower


- As you can see on the right picture in the right corner, we made a grab bag for the children to grab a present before going home after the party. They loved it!!!!


- cut the scales out the orange papers
- use the perforator on the pink and yellow papers


- glue the scales on the fish and write the name of the guest on the tail
- draw an eye and cut out the mouth

- write the name of the guest on the flower
- glue the dots on the flower around the name of the guest
2) THE GIFTS FOR THE CLASSMATES
- crocheted fishes on a key ring for the boys
- crocheted bracelets and necklaces for the girls

- for the necklace, you crochet a chain of 52 cm ( for a 5-year old)


3 single crochet stitches

then one normal chain stitch

then 1 half double crochet stitch

then one normal chain stitch
then 1 double crochet stitch

then one normal chain stitch
then 1 triple crochet stitch

- Continue this till the end of the chain.
- At the end sew on a button that fits in the loop of the other end
-----> necklace finished!
PRESENTATION OF THE GIFTS:
- Take paper cones, and decorate.
- make a little whole for the key ring or the bracelet and the necklace


- Put a muffin in every cone
- Then paint a big cardboard box blue with green seaweed and decorate with foam fishes. Arrange the gifts in the box and you'll have a perfect presentation!!!!


And of course for the teacher we made something special!!!!
3) GIFT FOR THE TEACHER
- Take 2 fabrics. At least one fabric has to be a thick fabric (but the second fabric may be thick as well).
- cut a rectangular of 74cm/37 cm from both the fabrics

- then write on another fabric (can be done on a leftover) all the names of the kids of the class,...
- pin it on the good side of the fabric which you want to put on the inside of the bag

- sew it on. On this picture all the names of the kids are sewed in the shape of the capital N (the first letter of the teacher's name)
- hem the top of the rectangular (2 cm), on both the fabrics

- fold the fabric in half (good side on the inside) and sew the side and bottom. Do this also with the other fabric.

- then cut 2 times 9cm/110cm (or the desired length to wear the bag plus 3 cm on each side to put in the bag while sewing)
- fold them lengthwise, good sides facing one another, and sew along the edges on 1,5 cm
- then turn everything inside out; the bags and the handles

- put the inside bag in the outside bag (the good sides facing to the outside) and pin them
- take the ears of the bag and put them 3 cm on each side in between the two fabrics. And pin them.
- first try it on to see if the length is good and if the bag hangs straight. If not, adjust it.

- then sew , inside-outside and ears on 2mm of the top
- and sew a second time on the stitching of the seam

- you can use this bag recto verso

- just turn it inside out


4) CROWN OF FELT
-sew two A4 felt pages together (do this a second time with 2 other felt pages for the inside of the crown)

- cut the figures you want to use on the crown. Use another felt page for this (you can do that with some leftovers)

-measure the size of the head and then cut the crown. Inside and outside should be identical

-then close both the crowns and sew it

- fit both the crowns on one another,good sides to the outside, and pin them together.
-sew along the edges

-first glue the figures on the crown and then sew them

this is the result!!!!! A crown for a real princess!!!!!!!!!

5) FLOWERS AS DECORATION
- blow 4 pink balloons and 1 yellow balloon.
- tie them with a rope as a flower


- As you can see on the right picture in the right corner, we made a grab bag for the children to grab a present before going home after the party. They loved it!!!!
