Posts tonen met het label SCHOOL. Alle posts tonen

vrijdag 27 september 2013

KOPVOETER, TAS EN CAKE VOOR DE JARIGE

STAN 3 JAAR

Joepie een jarige!!!!!
Als je "KLEUTER" zegt, denk ik direct aan "KOPVOETER"... En dat is het dan ook geworden...

KOPVOETERS VOOR DE KINDJES


En als ik aan Stan zijn juf denk, dan denk ik aan een "FIETS". Zijn juf komt altijd met de fiets.
Een leuke tas met een fiets dan maar...

EEN OMKEERBARE TAS VOOR DE JUF


EN VOOR IEDEREEN HEERLIJKE CAKE NATUURLIJK
 smullen maar ;-)

Wil je weten hoe de kopvoeters gemaakt zijn, lees dan verder:

1) Eerst een cirkeltje haken : 
- 4 steken op rij, 
- dan cirkel maken door haakpen in eerste steek te steken en een halfstokje maken in de eerste steek, zo ook in de andere drie steken
- 2x halfstokje maken per steek (8 steken)
- 2x halfstokje maken per steek (16 steken)
- 2x halfstokje maken per steek (32 steken)
- dan 3 rijen gewoon in elke steek 1x halfstokje ( 3 rijen van 32 steken)
- dan om de 3 steken 2x halfstokje  ( 2 steken 1x halfstokje en 3de steek 2x halfstokje = 40 steken)
- dan 2 rijen gewoon elke steek 1x halfstokje ( 2 rijen van 40 steken)
- dan om de 3 steken 2x halfstokje ( 2 steken 1x halfstokje en de 3de steek 2x halfstokje = 50 steken)
- dan altijd gewoon 1x halfstokje blijven haken per steek tot dat je halve bal de grote heeft die je wil
Dan verander je van kleur en maak een band door 1x halfstokje per steek verder te doen in die kleur
Vanaf dat je wil beginnen verminderen van steken om je bol af te werken, verander je weer van kleur.

Dan pas je vermindering van steken toe in omgekeerde volgorde van de vermeerdering. Neem de uitleg van hierboven (van de vermeerdering) maar dan van onderaan beginnen lezen. En ipv een steek te vermeerderen, verminder je door een steek over te slaan.
Als je op het einde nog maar een kleine opening hebt, dan vul je de bol met vulling. En als hij gevuld is, dan haak je de bol verder toe.

Dan is het tijd voor de armen en de benen.
Haak een ketting van 4 steken
Maak een cirkel door de 5 de steek in de eerste van de ketting te steken en een halfstokje te maken
Dan maak je in elke steek 2x halfstokje (8 steken)
En dan blijf je 8 steken halfstokje doen, tot je armen en benen de lengte hebben die bij je bol gaan
Als je de laatste steek hebt gemaakt, laat je genoeg draad over, want die gebruiken we om de armen en benen later aan de bol te naaien.
Haal de begindraad naar binnen
Vul de armen en benen met een vulling
Naai de armen en benen aan elkaar
Plak er twee oogjes op
En klaar is kees!!!!
Om ze nog een beetje persoonlijker te maken kan je de naam van de kindjes erop zetten
Haak een lange ketting, schrijf daar de naam mee, en naai vast

De tas voor de juf

Eerst beslissen hoe groot je de tas wil maken
Knip de 2 gelijke rechthoeken uit 2 verschillende stoffen.
Ik heb een dikke katoenen gordijnstof gebruikt en een lichtere katoenen stof
Ik heb 2 fietsen uit flockfolie geknipt om later op de effen stof te strijken. De juf komt namelijk altijd met de fiets naar school...
Dan nog 2 rechthoeken voor de flap (dezelfde breedte van de tas (kan ook iets kleiner bv, 0,5 tot 1cm))
Ik heb alle kanten eerst onder de overlock laten gaan.
Vouw elke rechthoek dubbel en stik ze één per één langs twee kanten toe (zijkant en onderkant). Laat de bovenkant open.

Ik heb op elke kant van de effen stof de fiets uit flockfolie gestreken. Laat je creativiteit maar gaan zou ik zo zeggen ;-)
Nu nog het schouderlint maken. Best dat je het lint uit de dikke gordijnstof maakt.
Beslis zelf hoe lang je het wil maken.
Neem die lengte plus 6 cm extra ( 3 cm aan elke kant om in de tas te steken en later vast te naaien)
Als breedte heb ik 8cm genomen. Knip deze rechthoek uit, strijk elke zoom van de lange zijde op 1 cm om
Leg de zomen op elkaar en strijk het lint.
Stik dan op 1mm van elke kant zodat je een mooi schouderlint hebt.
Draai de twee tassen binnenste buiten en speld de bovenkanten aan elkaar vast op 1 cm
Het schouderlint zit aan de binnenkant (aan de goede kant van de stof). Steek aan elke zijkant het lint ongeveer 3cm uit.
Stik de rand rond, maar laat nog een kleine opening om heel de tas weer binnenste buiten te draaien door deze kleine opening.
Stik dan nog een mooi sierstiksel op 1mm, zodat de opening ook toe is.
En aan elke kant waar de schouderlinten zitten, stik je een rechthoek met kruis in over de eindjes van de schouderlinten om ze een beetje stevigheid te geven.

Dan de 2 rechhoeken voor de flap met de goede kanten op elkaar leggen en helemaal rond stikken, enkel één lange kant open laten.
Keer het binnenste buiten. Draai de zoom aan elke open kant 1 cm naar binnen, strijk het, speld het vast aan de achterkant van de tas en zet het goed vast. Met twee mooie sierstiksels.


Voila, achterkant nummer 1


Achterkant nummer 2


Twee tassen in één!!!


maandag 19 augustus 2013

COVER FOR NOTEBOOKS

BACK TO SCHOOL IN STYLE WITH NEW COVERS FOR THE NOTEBOOKS!!!!!

The first assignment of every school year is always the same... "Please, cover your preschoolers notebook and music book".
So this year I started a little bit earlier to make a nice and special cover.

 
First I took the measurements and cut it out the covers of some old kids magazines. This I will put in the selfmade covers, to give it some strength.
Then I had a look in my wardrobe and found some old clothes.
I will use the pants of my pregnancy pajamas for Roos her covers and another old pregnancy pants and an old baby shirt for Stan his cover. So it will be a little recycling project... Here we go!!!!

First I cut my sons name out of the old baby shirt.
On the backside of the letters I iron some vlieseline to make it stronger and to prevent unraveling. 
 For my daughters name I'll use flock foil
The rectangular I cut out of the fabric (pants) has the following measurements:
- twice the length of the notebook, and
- the width of the notebook added by 3 cm.

I iron also vlieseline on this for the same reason as mentioned above.
 First I hem the short sides

  
Then I sew the name, pocket, embroidery or iron the flock foil,...
For the next step I flip both sides around the notebook to the middle (wrong side out and the good side in). Pin the top and bottom (long sides) around the notebook (approximately at 1 cm of the border on top and at the bottom). Then take the notebook out and sew the long sides top and bottom.

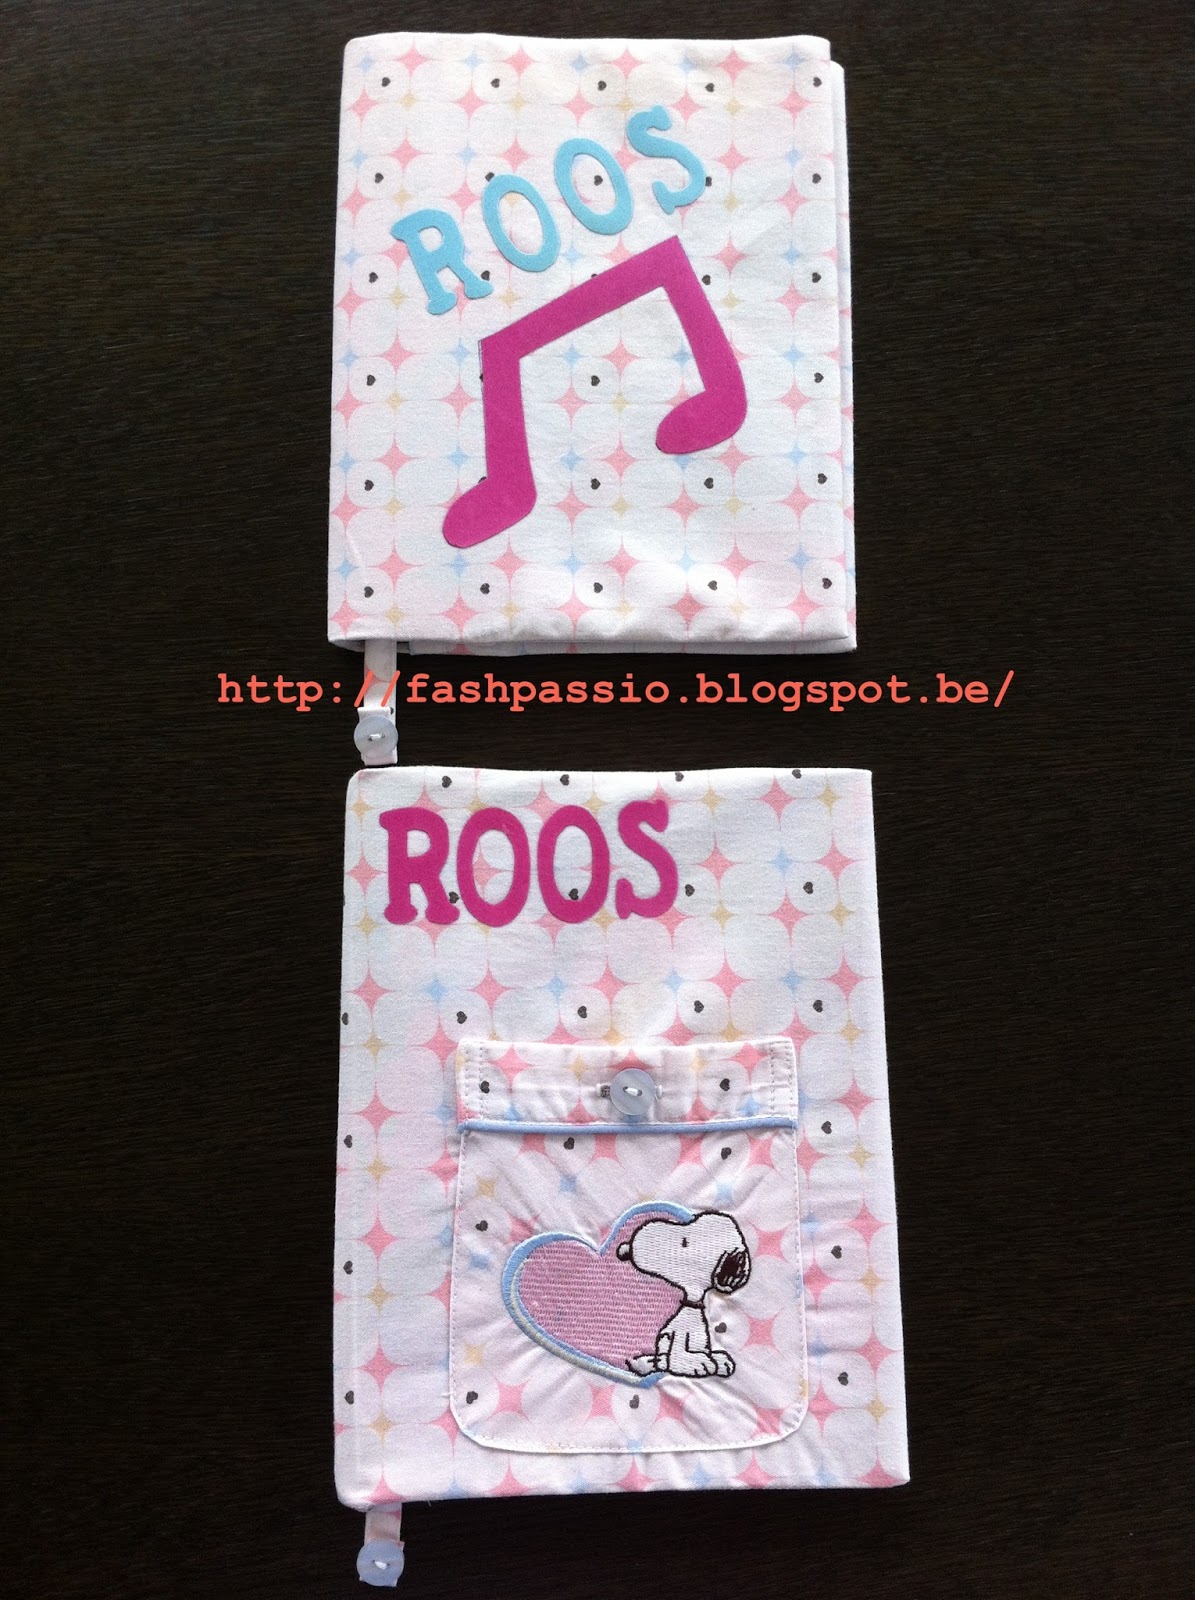
This is the result:

The front
 
 The inside
 

 The back


woensdag 26 juni 2013

"BIRTHDAY PARTY"


How to organize a birthday party with a little help of a 5-year old!!!


The summer holiday is coming closer and closer. This means birthday-time for Roos - already 5 years old!!!! Finally old enough to help with the preparations for her party. She loved it!!!

We made  INVITATIONS, GIFTS FOR HER CLASSMATES, GIFT FOR THE TEACHER, BIRTHDAY CROWN, DECORATION FOR THE HOUSE

We worked around the THEMES;  FISH (for the boys) & FLOWER (for the girls).

1) THE INVITATIONS:


- first take colored thick paper - blue for the fish and pink for the flower.  
- fold it in half
- cut the fish and flowers
 

- then take colored, thin origami paper - orange for the fish, pink and yellow for the flower.
- cut the scales out the orange papers
- use the perforator on the pink and yellow papers
 

- glue the scales on the fish and write the name of the guest on the tail
- draw an eye and cut out the mouth

- write the name of the guest on the flower
- glue the dots on the flower around the name of the guest


2) THE GIFTS FOR THE CLASSMATES

     - crocheted fishes on a key ring for the boys
     - crocheted bracelets and necklaces for the girls

- for the necklace, you crochet a chain of 52 cm ( for a 5-year old)
 

 - then return with a loop of 10 stitches
 - crochet waves:
3 single crochet stitches

then one normal chain stitch

 then 1 half double crochet stitch

then one normal chain stitch

 then 1 double crochet stitch

then one normal chain stitch
 

then 1 triple crochet stitch
- And then in reverse order back, but without the normal chain stitch
- Continue this till the end of the chain.
- At the end sew on a button that fits in the loop of the other end

-----> necklace finished!

PRESENTATION OF THE GIFTS:

- Take paper cones, and decorate.
- make a little whole for the key ring or the bracelet and the necklace


- Put a muffin in every cone

- Then paint a big cardboard box blue with green seaweed and decorate with foam fishes. Arrange the gifts in the box and you'll have a perfect presentation!!!!
  

And of course for the teacher we made something special!!!!

3) GIFT FOR THE TEACHER

- Take 2 fabrics. At least one fabric has to be a thick fabric (but the second fabric may be thick as well).
- cut a rectangular of 74cm/37 cm from both the fabrics

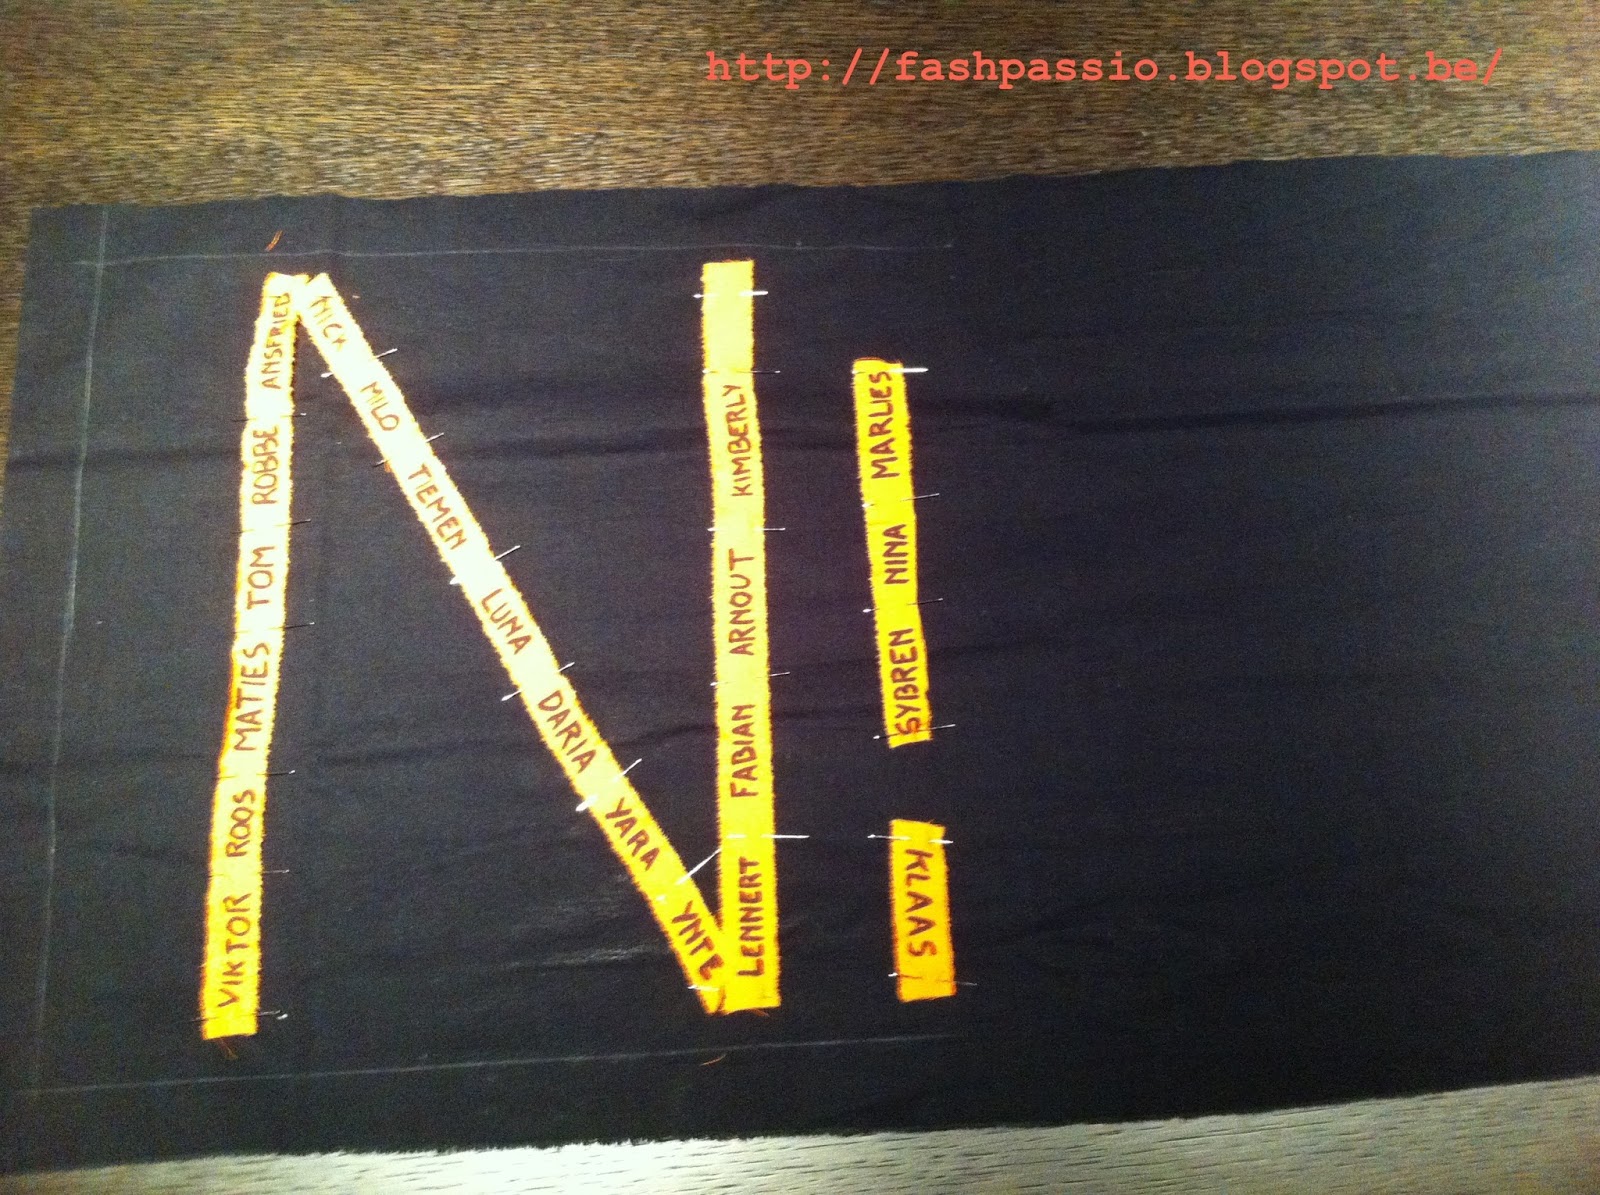
- then write on another fabric (can be done on a leftover) all the names of the kids of the class,...

- pin it on the good side of the fabric which you want to put on the inside of the bag

- sew it on. On this picture all the names of the kids are sewed in the shape of the capital N (the first letter of the teacher's name)
- hem the top of the rectangular (2 cm), on both the fabrics

- fold the fabric in half (good side on the inside) and sew the side and bottom. Do this also with the other fabric.

- then cut 2 times 9cm/110cm (or the desired length to wear the bag plus 3 cm on each side to put in the bag while sewing)
- fold them lengthwise, good sides facing one another, and sew along the edges on 1,5 cm
- then turn everything inside out; the bags and the handles

- put the inside bag in the outside bag (the good sides facing to the outside) and pin them
- take the ears of the bag and put them 3 cm on each side in between the two fabrics. And pin them.
- first try it on to see if the length is good and if the bag hangs straight. If not,  adjust it.

- then sew , inside-outside and ears on 2mm of the top
- and sew a second time on the stitching of the seam

- you can use this bag recto verso

- just turn it inside out


4) CROWN OF FELT
-sew two A4 felt pages together (do this a second time with 2 other felt pages for the inside of the crown)
- cut the figures you want to use on the crown. Use another felt page for this (you can do that with some leftovers)
-measure the size of the head and then cut the crown. Inside and outside should be identical

 -then close both the crowns and sew it


- fit both the crowns on one another,good sides to the outside, and pin them together.
-sew along the edges

-first glue the figures on the crown and then sew them
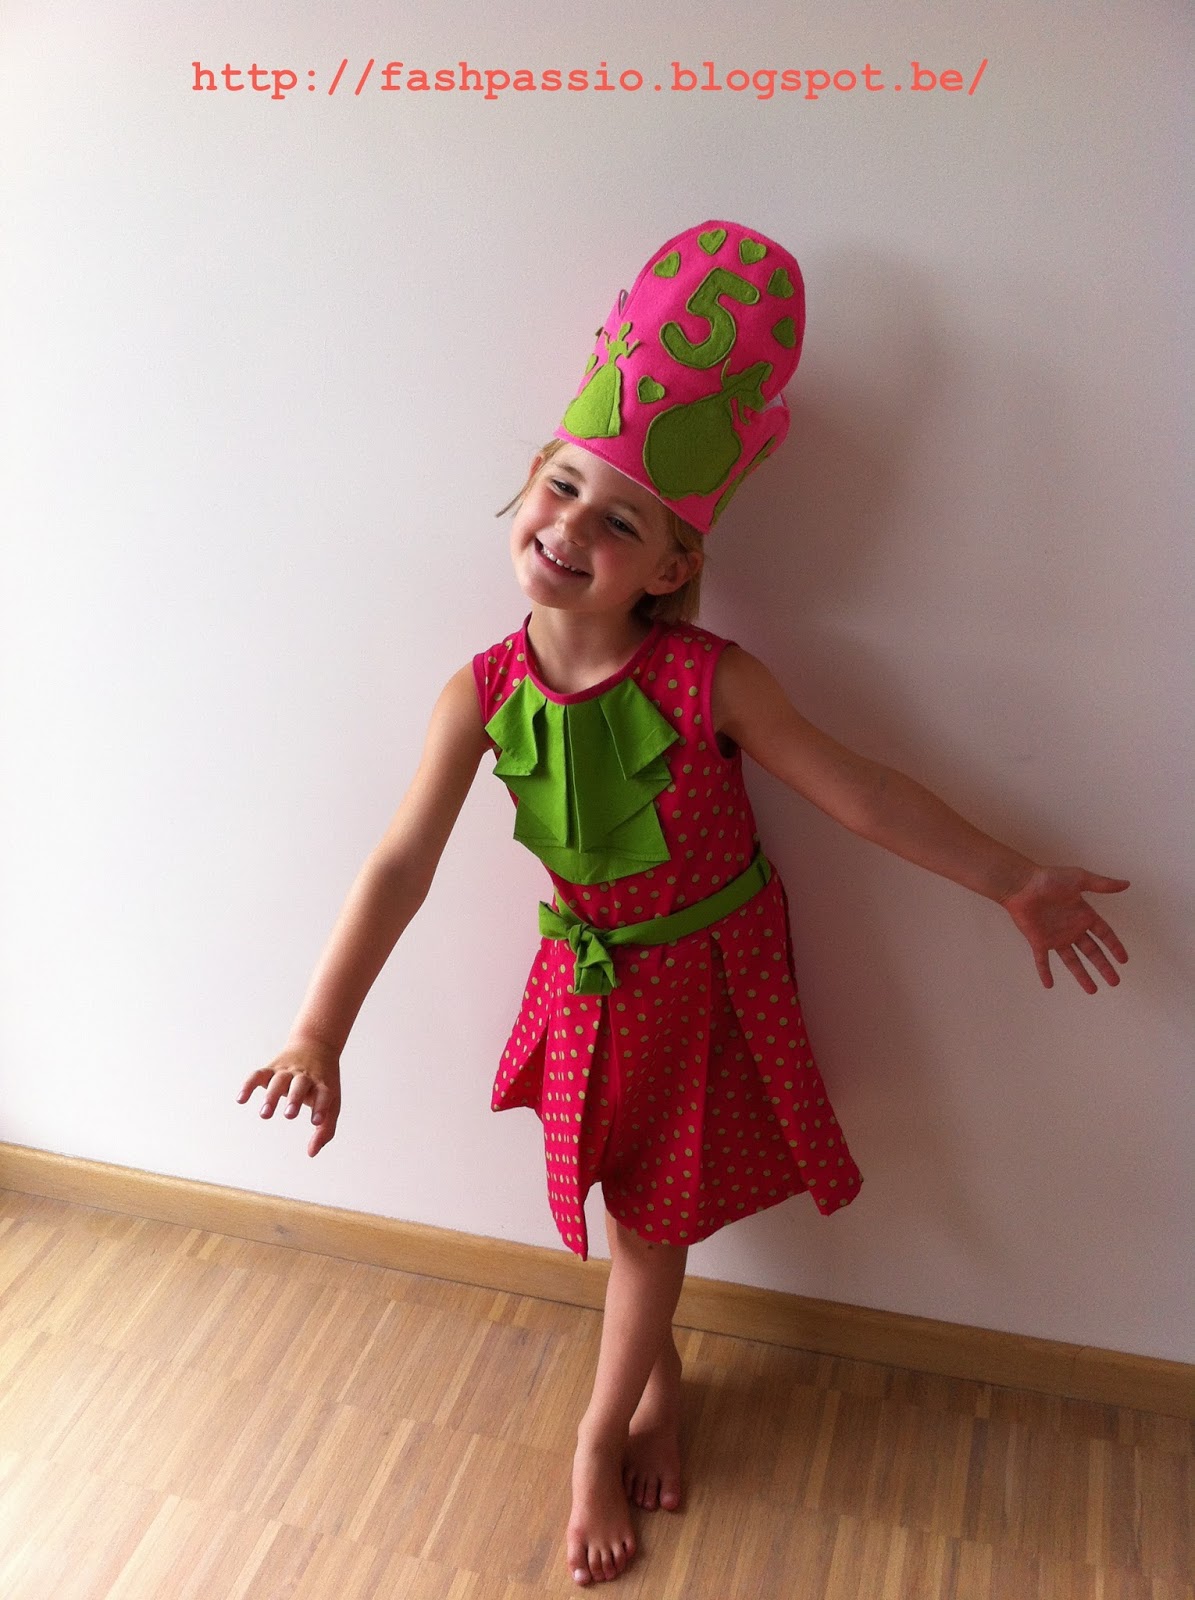
this is the result!!!!! A crown for a real princess!!!!!!!!! 


5) FLOWERS AS DECORATION

- blow 4 pink balloons and 1 yellow balloon.
- tie them with a rope as a flower


- As you can see on the right picture in the right corner, we made a grab bag for the children to grab a present before going home after the party. They loved it!!!!